Studio Overview
Contents
Studio Overview#
This guide is for implementers configuring OpenSPP Studio. You should be familiar with form builders like KoBoToolbox or ODK, but you don't need programming knowledge.
What is OpenSPP Studio?#
OpenSPP Studio is a no-code configuration interface that lets you customize OpenSPP without developer involvement. It handles 80% of common customization needs through visual tools.
Mental model#
Think of Studio like KoBoToolbox's form builder, but for configuring your entire registry system:
In KoBoToolbox |
In OpenSPP Studio |
|---|---|
Build a form |
Design an event type |
Add questions |
Add registry fields |
Set question types |
Choose field types |
Make fields required |
Configure validation |
Deploy form |
Activate configuration |
View submissions |
View collected data |
Accessing Studio#
Prerequisites#
You need Studio Editor or Studio Manager permissions
Access is controlled through user roles by your system administrator

Studio Components#
1. Registry Field Builder#
Use when: You need to track additional information about registrants or groups.
Examples:
Add "Disability Type" field to Individual registry
Add "Pantawid ID" for Philippines beneficiaries
Track "Vulnerability Score" for targeting
What you can do:
Add fields to existing registry tabs
Choose field types (text, number, date, dropdown, etc.)
Set field as required or optional
Control where the field appears in the form
What requires a developer:
Creating entirely new tabs or pages
Complex calculated fields with business logic
→ See Custom Fields (Registry Field Builder) for detailed instructions.
2. Event Type Designer#
Use when: You collect time-based observations or survey data about registrants.
Examples:
Create a vulnerability assessment form
Design monthly follow-up visit form
Build household verification survey
What you can do:
Create event types with custom fields
Define field types (text, number, date, selection, etc.)
Configure conditional field visibility
Set up approval workflows for event data
Organize fields into groups/tabs
What requires a developer:
Integration with external data collection tools (Kobo, ODK)
Complex data transformations
Performance optimization for large datasets
→ See Event Type Designer for detailed instructions.
3. Change Request Builder#
Use when: You need a formal workflow to update registry information with approval.
Examples:
Phone number update with supervisor approval
Address change request with review
ID document update workflow
What you can do:
Create change request types for field updates
Select which existing registry fields can be updated
Configure approval groups
Enable auto-apply when approved
What requires a developer:
Complex change requests (add member, split household, merge records)
Custom approval logic beyond standard workflows
Multi-record operations
4. Eligibility Rules (CEL Expressions)#
Use when: You need to define who qualifies for a program based on specific criteria.
Examples:
Households with income below threshold and children under 5
Elderly individuals over 65 living alone
Families with vulnerability score above 70
What you can do:
Build eligibility rules using CEL (Common Expression Language) expressions
Use the Expression Editor under the Rules menu
Access variables for registry fields, event data, and computed values
Test expressions with test personas
Browse pre-built Logic Packs for common eligibility patterns
What requires a developer:
Very complex logic with nested conditions across multiple data sources
Custom CEL functions not in the standard library
Performance-optimized batch eligibility checks for millions of records
→ See CEL expressions for detailed instructions on building eligibility expressions.
5. External connections (planned)#
Note
External connections for KoBoToolbox and ODK Central integration are planned for a future release. Currently, event types can store a Kobo Form ID reference for documentation purposes, but automatic data synchronization is not yet available.
Planned capabilities:
Connect to Kobo servers with API tokens
Connect to ODK Central servers
Import form definitions as event types
Automatic submission sync
Configuration lifecycle#
All Studio configurations follow the same lifecycle:
Draft → Active → Inactive
  ↑__________________|
     (can reactivate)
States explained#
State |
Meaning |
Who Can Edit |
|---|---|---|
Draft |
Configuration is being prepared |
Studio Editor or Manager |
Active |
Configuration is live and in use |
Studio Manager only |
Inactive |
Configuration was active but is now disabled |
Studio Manager only |
Important rules#
You can freely edit Draft configurations
You cannot delete Active configurations (deactivate first)
Deactivating shows impact warning (e.g., "This field is used by 1,247 records")
All changes are logged with user and timestamp
Permissions#
Studio has three permission levels:
Role |
Can Do |
|---|---|
Viewer |
View all configurations, but cannot create or edit |
Editor |
Create and edit draft configurations |
Manager |
Activate, deactivate, and delete configurations |
To assign Studio permissions to a user:
Go to Settings > Users & Companies > Users
Edit the user
Under Privileges, enable Studio
Choose the appropriate level: Viewer, Editor, or Manager
Note
Studio uses OpenSPP's privilege-based security system. Groups appear as "Studio / Viewer", "Studio / Editor", and "Studio / Manager" in the Groups list.
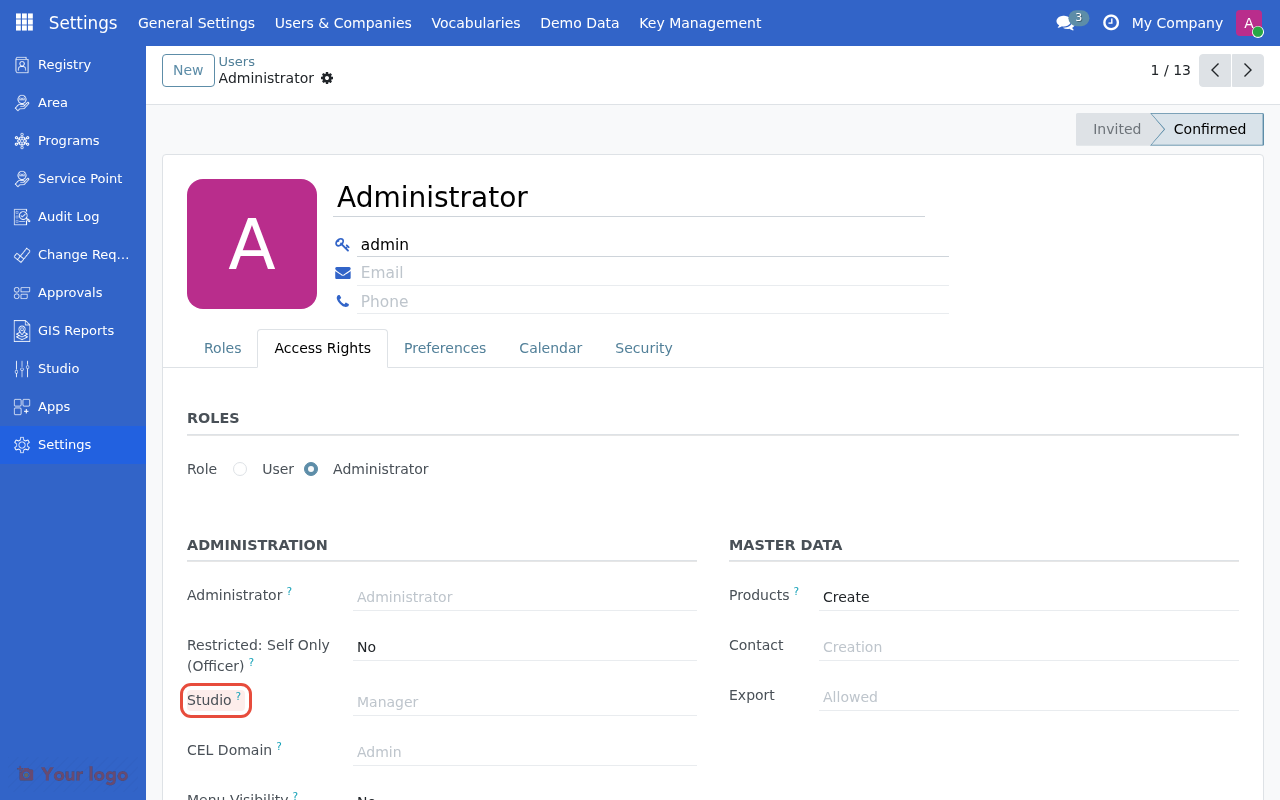
Under Privileges, enable Studio and choose the permission level.#
The 80/20 rule#
Studio is designed to handle 80% of common customization needs. Here's what's included and what requires developer help:
What Studio handles (80%)#
Task |
Studio tool |
|---|---|
Add fields to registries |
✓ Registry Field Builder |
Create event types |
✓ Event Type Designer |
Simple change requests |
✓ Change Request Builder |
CEL eligibility expressions |
✓ Expression Editor (Rules menu) |
Field validation |
✓ Configuration options |
Conditional visibility |
✓ Visibility settings |
What requires developers (20%)#
Task |
Why developer needed |
|---|---|
New registry tabs/pages |
View architecture changes |
Complex change requests (add member, split household) |
Multi-record operations |
Custom computed fields |
Python code required |
Kobo/ODK integrations |
API development needed |
Custom reports |
Report builder not in scope |
Performance-critical batch operations |
Queue job configuration |
When you need developer help, Studio will show clear messages like:
ℹ️ This feature requires developer assistance

Creating a change request that adds new group members
requires custom code. This cannot be done through Studio.

What you can do:
• Use the built-in "Add Member" CR type
• Contact your IT administrator for custom requirements
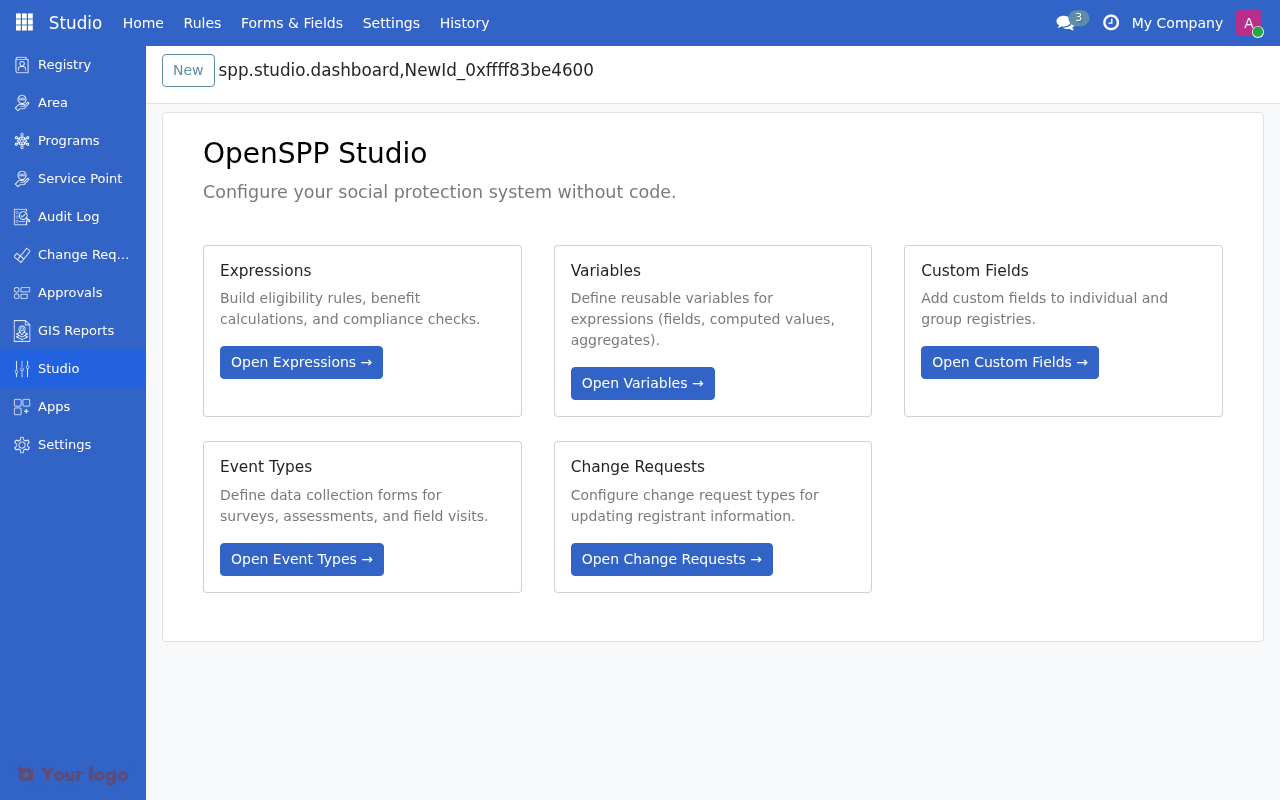
Studio dashboard#
The Studio Dashboard is your starting point for configuring OpenSPP without code.
Dashboard cards#
The dashboard provides quick access to the main Studio tools:
Card |
Description |
|---|---|
Expressions |
Build eligibility rules, benefit calculations, and compliance checks |
Variables |
Define reusable variables for expressions (fields, computed values, aggregates) |
Custom Fields |
Add custom fields to individual and group registries |
Event Types |
Define data collection forms for surveys, assessments, and field visits |
Change Requests |
Configure change request types for updating registrant information |
Each card includes a brief description and a button to open that tool.
Studio menu#
Besides the dashboard, you can access Studio features through the top menu bar:

Use the top menu bar to navigate between Studio sections.#
Home - Return to the dashboard
Rules - Work with expressions, variables, logic packs, and test personas
Forms & Fields - Manage custom fields, event types, and change request types
Settings - Advanced configuration options (Studio Manager only)
History - View audit logs of all Studio changes
Note
Additional menu items may appear depending on installed modules:
Privacy - Configure consent and data classification (requires
spp_studio_consent)Connections - Set up external data sources like Kobo/ODK (requires
spp_studio_dci)
Best practices#
1. Start with draft#
Always create configurations as Draft first:
Test thoroughly before activating
Have colleagues review configurations
Check that field names and labels are clear
2. Use clear names#
Choose descriptive names that other staff will understand:
Bad |
Good |
|---|---|
"Field 1" |
"Pantawid ID Number" |
"Survey" |
"Monthly Household Visit" |
"Update" |
"Phone Number Change Request" |
3. Document your intent#
Use help text and descriptions:
Explain what fields are for
Note where data comes from
Describe when to use change request types
4. Test before activating#
For CEL expressions:
Use the test personas feature to validate your expressions
Verify expected registrants are included/excluded
Check with program staff that logic is correct
5. Coordinate with team#
Before activating configurations that affect others:
Notify relevant staff
Explain what will change
Provide training if needed
Studio vs developer work#
Understanding when to use Studio vs when to request developer help:
Use Studio when#
Adding standard field types to registries
Creating new survey/event types
Building simple update workflows
Defining eligibility based on existing data
Request developer help when#
Needing calculations or formulas in fields
Creating complex multi-step workflows
Building custom integrations
Optimizing performance for large-scale operations
Adding new core functionality
Are you stuck?#
Can't see certain options in Studio? Check your permissions. You may need Studio Manager access for activation/deactivation.
Configuration doesn't appear after activating? Try refreshing your browser. Some changes require a page reload.
Want to undo an activation? Studio Managers can deactivate configurations. The system will warn you about impacts before deactivating.
Need to change an active configuration? You cannot edit active configurations directly. Options:
Deactivate, edit, reactivate (may cause data issues)
Create a new version as draft, activate new one, deactivate old one
Contact developer for structural changes
Getting "field already exists" error? Field names must be unique. Choose a different name or check if the field was created previously.
Next steps#
Now that you understand Studio's capabilities:
To add custom fields: Continue to Custom Fields (Registry Field Builder)
To create event types: Continue to Event Type Designer
To define eligibility rules: Continue to CEL expressions