Contributing
Contents
Contributing#
Thank you for considering contributing to the OpenSPP project! We welcome and appreciate contributions from the community, and are grateful for the time and effort that people put into improving the project.
Code of Conduct#
We expect all contributors to the OpenSPP project to adhere to our Contributor Covenant Code of Conduct. This document outlines the standards of behavior that we expect from all members of the community, and provides guidance on how to report any incidents of misconduct.
Did you find a bug?#
Do not open up a GitHub issue if the bug is a security vulnerability in OpenSPP, and instead follow the OpenSPP Vulnerability Disclosure Policy.
Ensure the bug was not already reported by searching on GitHub under Issues.
If you're unable to find an open issue addressing the problem, open a new one. Be sure to include a title and clear description, as much relevant information as possible demonstrating the expected behavior that is not occurring.
Contributing to the code#
Getting Started#
Before you start working on a new feature or bug fix, it's a good idea to check the project's issue tracker to see if someone else is already working on it. If you find an open issue that you'd like to work on, you can comment on the issue to let people know that you're planning to take it on.
If you don't see any open issues that match your area of expertise, feel free to open a new issue to propose a new feature or report a bug. Make sure to include as much detail as possible, and to clearly describe the problem or feature that you're proposing.
Submitting a Pull Request#
Once you have made your changes, you can submit a pull request (PR) to propose your changes for review and inclusion in the project. Here are some tips for making a successful PR:
Make sure that your PR is focused on a single issue or feature. Avoid bundling multiple unrelated changes in a single PR.
Write clear and concise commit messages that explain the purpose of each change.
Follow the project's coding style and conventions.
Test your code thoroughly before submitting your PR. Make sure that all unit tests pass, and consider adding additional tests if necessary.
Ensure that your code is well-documented using reStructuredText markup, with clear and concise comments explaining any non-obvious code.
Make sure that your PR is reviewed by at least one other contributor before submitting.
Address any feedback or issues raised during the review process in a timely manner.
If your PR involves any significant changes or new features, consider writing documentation or updating the project's README to reflect these changes.
Make sure that your PR is up to date with the latest version of the codebase before submitting.
If your PR is large or complex, consider breaking it down into smaller, more manageable chunks that can be reviewed and merged more easily.
Documentation Update#
If your PR involves any significant changes or new features, it is important to update the project's documentation to reflect these changes. This will help users and developers understand how to use and work with the updated code.
To update the documentation, you should edit the relevant documentation and submit a separate PR with your documentation changes to the documentation project.
When updating the documentation, make sure to:
Clearly and concisely describe the changes that have been made.
Provide examples or code snippets to illustrate how to use the new or updated features.
Update any relevant reference documentation or API documentation.
Test the documentation to ensure that it is accurate and up-to-date.
Updating the documentation is an important part of the PR process, and will help to ensure that the project is easy to use and understand for all users and developers.
Review Process#
Once you have submitted your PR, it will be reviewed by one or more contributors to the project. The review process is an opportunity for the project maintainers to provide feedback on your code, and for you to address any issues or concerns that are raised.
During the review process, you may be asked to make changes to your code, or to provide additional information or clarification. It's important to be responsive to these requests, as it will help to ensure that your PR is accepted and merged in a timely manner.
Some things to keep in mind during the review process:
Be open to feedback and suggestions. The review process is meant to help improve the quality and reliability of the project, and to ensure that all code meets the standards of the project.
Address all issues and concerns raised during the review process. If you disagree with a suggestion or comment, feel free to engage in a constructive dialogue to reach a resolution.
If you are asked to make changes to your code, try to make these changes as soon as possible. This will help to keep the review process moving forward and ensure that your PR is reviewed and merged in a timely manner.
Once all issues have been addressed and the code has been approved by the reviewers, your PR will be ready to be merged into the project.
Merging a Pull Request#
Once your PR has been reviewed and all issues have been addressed, it can be merged into the project. In most cases, PRs will be merged by the project maintainers, but in some cases, contributors may be granted the ability to merge their own PRs.
Before merging a PR, it is important to double-check that all of the following conditions have been met:
The PR has been reviewed and approved by at least one other contributor.
All issues and concerns raised during the review process have been addressed.
The code has been tested and is known to be in good working order.
The PR is up to date with the latest version of the codebase.
Once these conditions have been met, the PR can be safely merged into the project. This can usually be done with a single click using the "Merge" button in the GitHub interface.
After your PR has been merged, it will become part of the official project codebase, and will be included in the next release of OpenSPP. Congratulations on your contribution!
Contributing to the documentation#
If you want to contribute to the documentation, you can do so by following the steps below:
Fork the documentation repository.
Fork the project's documentation repository
Make your changes in a new branch. It is recommended to name your branch something descriptive, such as "feature/new-section" or "bugfix/typo-correction".
Before making any changes, ensure that you have the necessary dependencies installed and that you have a local version of the documentation set up. This can typically be done by installing Sphinx, and then running the command
make htmlto build the documentation.Install pre-commit by running
pip install pre-commitorbrew install pre-commitdepending on your system.Once you have made your changes, use the command
make htmlagain to rebuild the documentation and check that your changes display correctly.Configure pre-commit by running
pre-commit install.Before committing any changes, make sure to run the project's pre-commit checks:
pre-commit run --all-files. These checks will ensure that the code adheres to the project's style guidelines and that there are no obvious errors or issues.Commit your changes with a clear and descriptive commit message.
Push your branch to your fork of the repository.
Submit a pull request to the main repository for review.
Make sure that you have explained in the pull request what changes you've made and why. And if there's any specific instructions or dependencies need to be followed.
The project lead or maintainers will review the pull request and provide feedback. If any revisions are requested, make the necessary changes and push them to the same branch on your fork.
Once your pull request is approved, it will be merged into the main repository.
Building the documentation#
It is recommended that you use a virtual environment to build the documentation. This will allow you to install the required dependencies without affecting your system.
Python 3.11 should be used to build the documentation. You can install it using your package manager or by following the instructions on the pyenv GitHub page.
make html
Synchronize the browser while editing#
Use sphinx-autobuild to view changes in the browser while you edit documentation.
make livehtml
You can open a browser at http://127.0.0.1:8050/ to preview the documentation.
American English spelling, grammar, and syntax, and style guide#
Spellings are enforced through Vale.
OpenSPP uses American English.
Spelling is configured in Makefile, .vale.ini, and in files in styles/Vocab/OpenSPP/.
Authors should add new words and proper names using correct casing to styles/Vocab/OpenSPP/accept.txt, sorted alphabetically and case-insensitive.
Vale also provides English grammar and syntax checking, as well as a Style Guide. We follow the Microsoft Writing Style Guide.
To perform all these checks, run the following command.
make vale
Because it is difficult to automate good American English grammar and syntax, we do not strictly enforce it. We also understand that contributors might not be fluent in English. We encourage contributors to make a reasonable effort, and to request a review of their pull request from community members who are fluent in English to fix grammar and syntax. Please ask!
All links must be valid#
Important
Before you add a link, consider whether you really need it for the documentation.
Avoid linking to blog posts because they rapidly succumb to bitrot.
It is preferred to copy the content from the source and add a link to the source as a reference through a seealso admonition or footnote, than to merely link to the source.
Valid links are enforced automatically through Sphinx's linkcheck builder.
Configuration of the linkcheck builder is in Makefile and docs/conf.py.
linkcheck_ignore supports regular expression syntax.
When authors add a link to the documentation, it must be a valid public URL without requiring authentication.
If it is not a valid link, or is private or local, then you must exclude it from linkcheck by wrapping it in single backticks.
Visit the URL `http://www.example.com` for an example.
This will render as follows.
Visit the URL
http://www.example.comfor an example.
If a link has succumbed to bit rot, then try finding the most recently scraped version on the Internet Archive Wayback Machine, and update the link.
To validate links, run the following command.
make linkcheck
Open /_build/linkcheck/output.txt for a list of broken links.
Danger
Please do not abuse linkcheck_ignore.
There is a special place in hell reserved for contributors who do not bother to update bad links, either dead ones or redirects, causing linkcheck to fail.
And there is a doubly punishing place for those who disable linkcheck because there are too many bad links.
Please do not be "that person".
Syntax highlighting#
Pygments provides syntax highlighting in Sphinx.
When including code snippets, you should specify the language. Authors must use a proper Pygments lexer and not generate warnings.
The snippet must be valid syntax for the language you specify, else it will not be highlighted properly. Avoid adding comments to code snippets, unless you use valid comment syntax for that language. For example, JSON does not allow comments.
Do not indicate elided or omitted code with ellipses (... or …).
These are almost never valid syntax and will cause syntax highlighting to fail for the code block.
Choosing a Lexer#
Some lexers are less than perfect.
If your code block does not highlight well, then consider specifying a less ambitious lexer, such as text.
Use shell for commands to be issued in a terminal session.
Do not include shell prompts.
This will make commands easy to copy and paste for readers.
Use console for output of a shell session.
If you have a mix of a shell command and its output, then use console.
If xml does not work well, then try html.
jsx has a complex syntax that is difficult to parse.
We have high hopes for the project jsx-lexer.
We include it in our requirements.txt file.
Please contribute to its further development.
The lexers html+ng2, scss, http, less are also suboptimal and particular.
If no other lexer works well, then fall back to text.
At least then the build will succeed without warnings, although syntax highlighting for such snippets will not appear.
Documentation quality requirements#
We use GitHub Actions with every pull request to enforce OpenSPP Documentation quality. We recommend that you build the documentation locally to catch errors and warnings early on.
MyST reference#
This section provides information and examples for how to write proper MyST syntax—with references to Sphinx extensions for their specific directives—in OpenSPP Documentation.
MyST, reStructuredText, and Markdown#
We use MyST, or Markedly Structured Text, a rich and extensible flavor of Markdown, for authoring training documentation.
MyST extends Markdown by incorporating all the features of reStructuredText and Sphinx and its extensions. Contributors are welcome to use either Markdown or MyST syntax.
MyST may be more familiar to reStructuredText authors.
MyST allows the use of a fence and {rst-eval} to evaluate native reStructuredText.
This may be useful when Markdown does not provide sufficient flexibility, such as for figure.
MyST syntax reference#
The following are frequently used snippets and examples.
Cross-references#
Link to a chapter or page#
Here is how to set up and build the documentation locally {doc}`/contributing/setup-build`.
Here is how to set up and build the documentation locally /contributing/setup-build.
Link to a heading#
(myst-reference-hello-heading-label)=

##### Hello heading

Read the section {ref}`myst-reference-link-heading-label`.
Hello heading#
Read the section myst-reference-hello-heading-label.
Images and figures#
Figures allow a caption and legend, whereas images do not. However we can enhance images with cards to add a caption and more features.
Use image for anything but diagrams.
Use figure for diagrams.
Static assets#
When the documentation is in a submodule, paths to static assets—including, images, figures, and videos—must resolve in both the main documentation and the submodule's documentation.
Inside the docs directory, place static assets in the /_static/ directory, and preferably inside a subdirectory named after the part or page of the documentation.
For example, in the volto submodule, inside its src/docs directory, place an image at /_static/user-manual/block-left-add-icon.png.
In your markup, use that same docs-root-relative path for the target, such as /_static/user-manual/block-left-add-icon.png.
Don't use file-relative paths.
Configuration in the conf.py files for the main documentation and its submodules handle the resolution of docs-root-relative paths for you.
Width of media#
The main content area of a page in the documentation is 743 pixels wide. When taking screenshots or videos, resize your browser window, or try to limit the width of your media to 740 pixels. This will preserve legibility of images.
Enhance images#
We use cards from the Sphinx extension sphinx-design to enhance the display and functionality of images.
Cards allow the display of a caption, create a link to the source image to display when it is too large to fit within the documentation page without scaling, and add a border to demarcate the image from the page's white background.
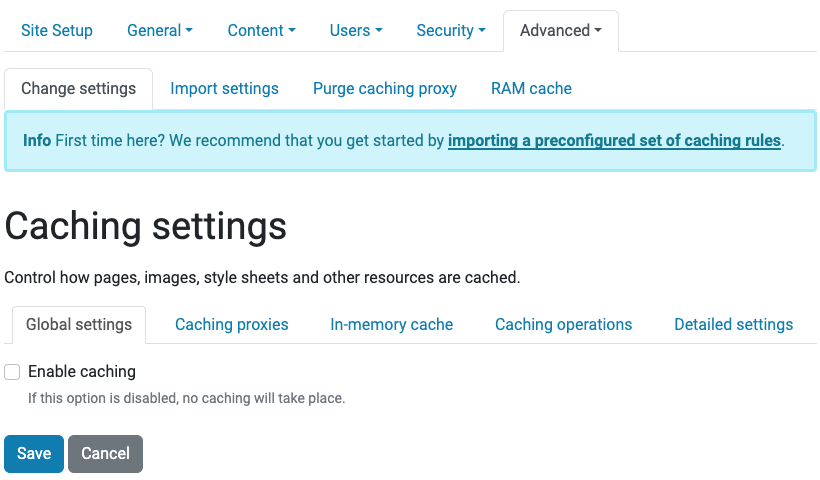
The following MyST example will display as shown below.
````{card}
```{image} /_static/caching/caching-disabled.png
:alt: Caching Control Panel
:target: /_static/caching/caching-disabled.png
```
+++
_Caching Control Panel_
````
Accessibility with alt text#
From Web Accessibility In Mind (WebAIM):
Alternative text serves several functions:
It is read by screen readers in place of images allowing the content and function of the image to be accessible to those with visual or certain cognitive disabilities.
It is displayed in place of the image in browsers if the image file is not loaded or when the user has chosen not to view images.
It provides a semantic meaning and description to images which can be read by search engines or be used to later determine the content of the image from page context alone.
The following MyST example will display as shown below.
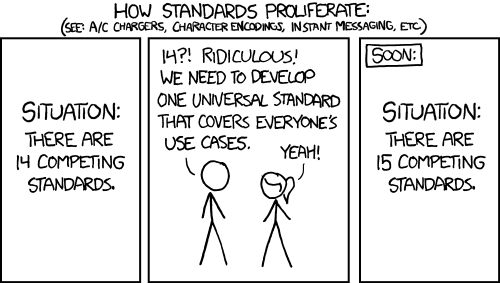
```{image} /_static/standards.png
:alt: XKCD "Standards" comic strip
```
Inline images#
For inline images, we use the MyST extension html_image.
Example syntax is shown below.
You can copy
<img alt="Copy icon" src="../../_images/copy.svg" class="inline" /> blocks.
Note that the HTML attribute class must be set to inline to render the image inline at 1rem.
The above syntax renders as shown below.
You can copy
blocks.
Images and figures should always include alt text.
The following MyST example will display as shown below.
```{eval-rst}
.. figure:: /_static/voting_flowchart.png
    :alt: Voting flowchart

    This is a caption in a single paragraph.

    This is a legend, which consists of all elements after the caption.
    It can include a table.

    ======  =======
    Symbol  Meaning
    ======  =======
    ⃞       Object
    ⬭       View
    ➞       Flow
    ======  =======
```
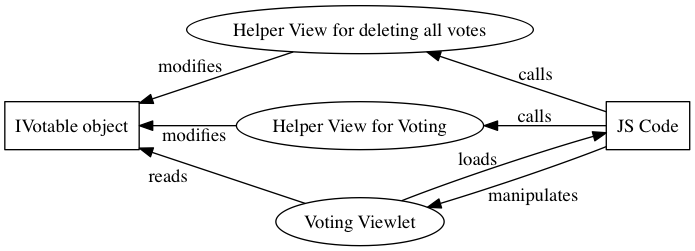
This is a caption in a single paragraph.#
This is a legend, which consists of all elements after the caption. It can include a table.
Symbol |
Meaning |
|---|---|
⃞ |
Object |
⬭ |
View |
➞ |
Flow |
Video#
To embed local videos, such as recordings of demonstrating the user interface, we require that the videos be saved as .mp4 for greatest compatibility, usability, accessibility, and reduced file size.
Avoid animated GIFs because they do not allow control of playback.
Audio is not required, but may be helpful. If you include audio, it is helpful to include closed captions or a transcript.
It is helpful to include overlays of key strokes, and mouse and other input gestures, to describe how to interact with the user interface.
Paths to videos must resolve in both the main documentation and the submodule's documentation, if present. See static-assets-label for details.
Example MyST syntax is shown below.
```{video} /_static/user-manual/blocks/block-copy-cut.mp4
    :width: 100%
```
Note that the path must be absolute to support both submodules and the main documentation. Don't use file-relative paths.
Diagrams and graphs with Graphviz#
We use Graphviz and its Sphinx extension sphinx.ext.graphviz to render diagrams and graph visualizations.
The following MyST example will display as shown below.
```{eval-rst}
.. graphviz::
    :align: center

    digraph viewstructure {
      {
        node [margin=5,shape=box]
      }
      ZCML -> {Python, Template};
    }
```
Code block#
A Python code snippet without reStructuredText options, using a simple fence.
```python
a = 2
print("my 1st line")
print(f"my {a}nd line")
```
a = 2
print("my 1st line")
print(f"my {a}nd line")
A Python code snippet with reStructuredText options, using a fence with the parsed reStructuredText directive code-block.
```{code-block} python
:linenos:
:emphasize-lines: 1, 3

a = 2
print("my 1st line")
print(f"my {a}nd line")
```
1a = 2
2print("my 1st line")
3print(f"my {a}nd line")
Escape literal backticks inline#
This is MyST syntax for term `React `
This is MyST syntax for term React
Glossary terms#
Add a term to the glossary-label, located at /glossary.md.
React
[React](https://reactjs.org/) is a JavaScript library for building user interfaces.
Reference a term in the glossary-label.
Using React makes frontends fun again!
Using React makes frontends fun again!
Nesting directives#
You can nest directives, such as admonitions and code blocks, by ensuring that the backtick-lines corresponding to the outermost directive are longer than the backtick-lines for the inner directives.
````{tip}
To use formatted string literals ("f-strings"), begin a string with `f` or `F` before the opening quotation mark or triple quotation mark.
Inside this string, you can write a Python expression between `{` and `}` characters that can refer to variables or literal values.

```{code-block} python
:linenos:
:emphasize-lines: 1, 3

a = 2
print("my 1st line")
print(f"my {a}nd line")
```
````
This would be rendered as:
Tip
To use formatted string literals ("f-strings"), begin a string with f or F before the opening quotation mark or triple quotation mark.
Inside this string, you can write a Python expression between { and } characters that can refer to variables or literal values.
1a = 2
2print("my 1st line")
3print(f"my {a}nd line")
Sphinx extensions#
We use several Sphinx extensions to enhance the presentation of OpenSPP documentation.
sphinx.ext.graphvizallows you to embed Graphviz graphs in your documents.sphinx.ext.intersphinxprovides linking between separate projects that use Sphinx for documentation.sphinx.ext.todoadds support for todo items.sphinx_copybuttonadds a little "copy" button to the right of code blocks.sphinx-designadds grids, cards, icons, badges, buttons, tabs, and dropdowns.sphinxcontrib.httpdomainprovides a Sphinx domain for describing HTTP APIs.sphinxcontrib.httpexampleenhancessphinxcontrib-httpdomainby generating RESTful HTTP API call examples for different tools from a single HTTP request example. Supported tools include curl, wget, httpie, and python-requests.sphinx.ext.viewcodegenerates pages of source code modules and links between the source and the description.sphinx.ext.autosummarygenerates function/method/attribute summary lists.